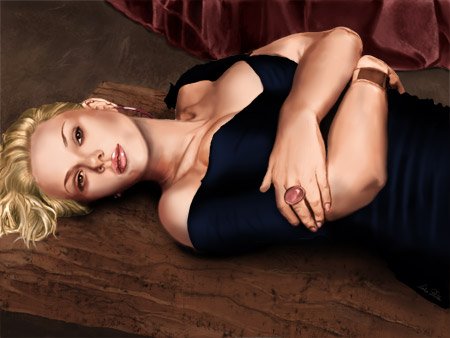
Final Result:
What you will need
- Adobe Photoshop.
- A reference photograph.
A Few things first. . .
A note about using grids:
I really recommend using a grid for beginning artists. You’ll find that your work will improve dramatically, and that’s always encouraging :). I also encourage you to try drawing without a grid. I used the grid in the beginning (to check proportions, placement etc) and then later hid the grid while I was working with color.
You can read my tutorial: How to create a grid quickly and easily with Photoshop
A note about brushes:
Until the last part of the portrait I only used basic photoshop brushes with their hardness normally set to 0%. I tended to alternate between either 100% or 30% opacity.
Part One: Blocking out the shapes
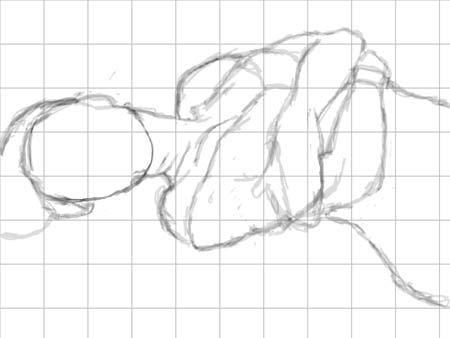
Believe it or not the hardest part of drawing isn’t the details. It’s blocking out the shape. I can’t stress how important this step is, as it sets the foundation for your entire image. I don’t care how good your details are if your foundation isn’t solid your piece will suffer.
It’s important to stay loose while drawing so go ahead and scribble in shapes, keep an eye on the grid as you do this but don’t be overly concerned about getting it perfect, this will come later.
This is about 45 minutes of work, notice that I don’t have that many details, I was primarily concerned about the placement of forms. I used the basic brush with an opacity around 30%.
Then I started working on the face. In portraits the face and hands are CRUCIAL. This is what sells the piece. Keep that in mind as you are working. In order to achieve a believable likeness you must keep facial proportions in consideration.
Use facial proportions:
Even though every face is different, they all follow the same facial proportions. Don’t forget these.
Here are some of the most useful.
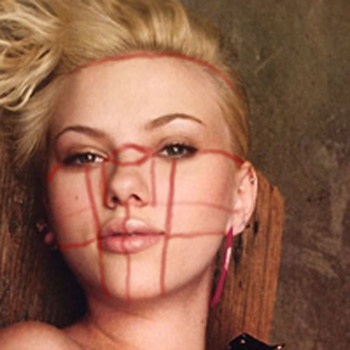
Looking at this picture face-on all these lines would be straight, I had to compensate for the slight angle.
Don’t obsess about them yet though, notice that the details aren’t perfect, I just put in some nose, mouth and eye shapes to get the general proportions right.
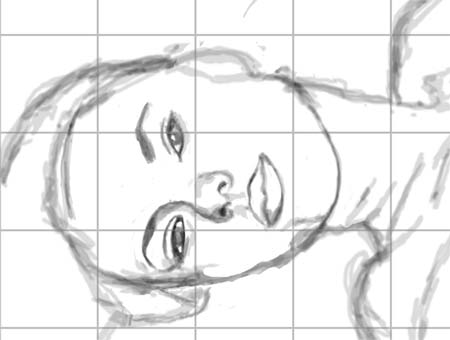
As I started to gain confidence in my strokes I started to zoom in and refine them. I also added more detail to the face.
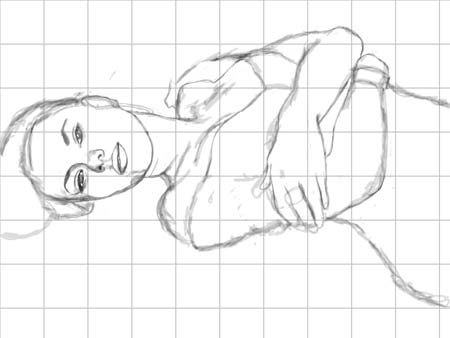
Periodically flip the canvas
While drawing, it’s a good idea to constantly flip the canvas. It helps you get a fresh perspective. I frequently notice things that I wouldn’t have otherwise.
Take a minute and look the image below, are some details easier to see than others?
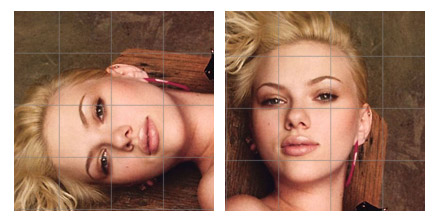
Don’t be concerned at this point if the portrait doesn’t look like the person. That comes next :).
Part Two: Adding depth through chiaroscuro (shading)
Lines can only give a piece so much depth so let’s add some shading to make it pop out.
Generally it’s a good idea to apply shading evenly across the picture but sometimes you can just get lost in a particular spot (especially if you’re working on a face.)
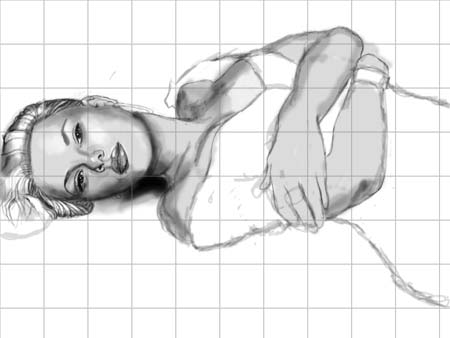
In the next step I continued to block out the tones. Getting my darkest darks and my lightest lights. I also hid the grid.
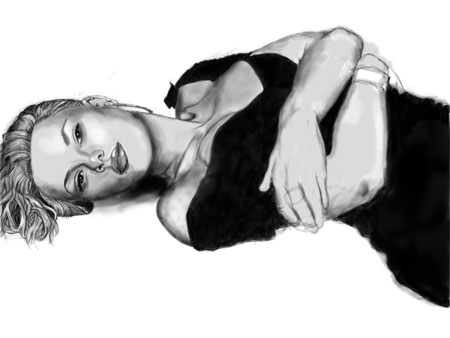
Part Three: Adding color
This was my first attempt at color. I made a new layer above my figure layer and set its blending style to Multiply. This preserves the black lines and lets you paint over it (like a coloring book). This technique is great for graphic novels but I wasn’t satisfied with it for this piece.
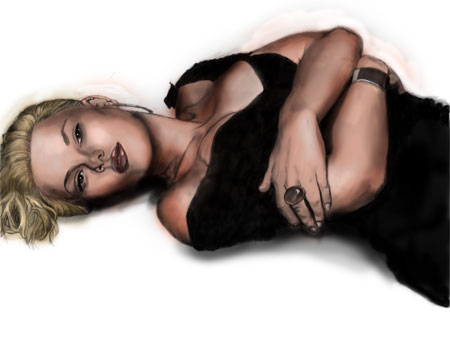
One thing that I want to point out is I rarely use the eraser tool. Instead I tend to favor the brush. If I have a black spot that I want to make white I don’t erase it, I replace it with white.
With that said, in the following instance I did remove the color and start over again. This time I played with the Curves panel. This actually changed the colors of my lines which was much more realistic.
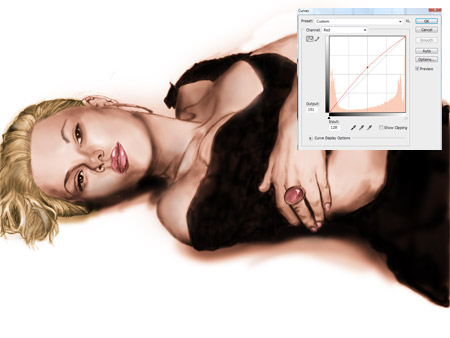
At this point the base figure is done, now comes the fun part. . .
Part Three: Tweaking!
Art is 10% construction and 90% tweaking. (At least it is for me). The thing about tweaking though is that it won’t work if you don’t have a solid foundation. So make sure that you have the right proportions and balance otherwise it’s a lot more work to fix it afterward.
As you can see below I refined the face, breast region and arms. I also added a black dress layer.
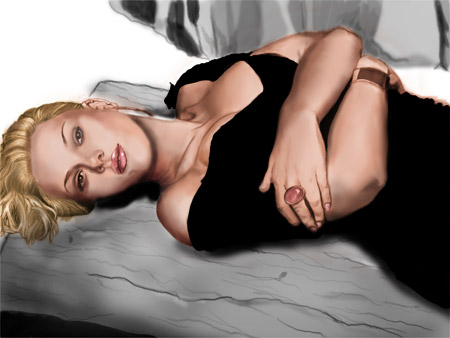
Next I started to work on the background.
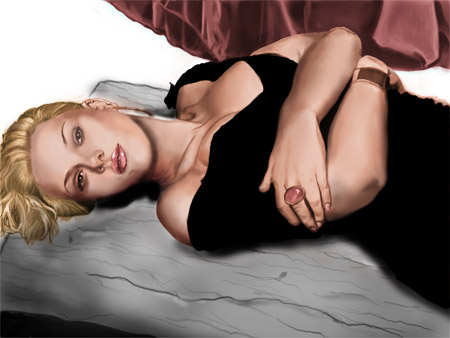
I felt that the skin wasn’t warm enough so I played with curves some more to give it a more soft golden color.
I also put in highlights on her dress and worked with the background more too.
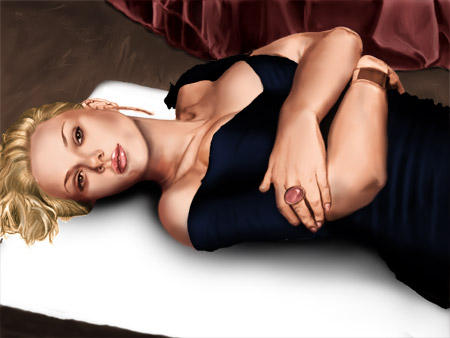
The Result
Here is the final result, I used natural brushes in Photoshop to give the wood it’s texture.

Conclusion
The process in theory is very simple but it takes a long time. I spent close to 20 hours on this project and there is more I can do with it (such as fix her left eye and thumb).
I also asked fellow artists for critiques. (I don’t recommended asking friends and family because generally they only thing they will say is “it doesn’t look like her” or “it looks like her.”) A great place for advice is the forums at 3dTotal.com or cgSociety.org
I hope this was helpful, if you have any questions or suggestions feel free to contact me.
I’m accepting requests. If any of you have a question about Photoshop or PHP and would like to see a tutorial, send me an email here. Make sure that you put “request” in the subject.
Comments
Post by amrino on June 20, 2007
nice....!
Post by haydon on June 20, 2007
This is an amazing piece of work. I'd love to learn to draw like this
Post by candace on June 21, 2007
very beautiful work! thank you for sharing this with us. keep up the awesome work!
Post by Iza on June 24, 2007
wow, that is really awesome. I would love to have that kind of portrait. How much you would charge if somebody wants to order one?
Post by Dusty on June 26, 2007
I can draw things with pencil and paper..but I never tried on a computer. Also, I really love your work you did, but my question is did you draw this with a mouse, or like is there a setup that your can get a pad that hooks up to the computer, and you could draw like a pencil and paper? Thanks.
Post by Gabor on July 1, 2007
Dusty, there is pads that you can use... the most famous brand I think is Wacom... do a google on them, and you'll find more information about this.
Post by iwan on July 2, 2007
usefully for me, thanks
Post by chumbawumba on July 10, 2007
my eyes have never beheld such beauty...
Post by dumby on July 10, 2007
WOW you make this look so easy and I cant even do the grid! lol I dont get how to draw it. I dont have a very steady hand
Post by ap on July 10, 2007
nice job
Post by Roland on July 13, 2007
H-O-L-Y S-H-*-T-!!! That's absolutely amazing dude, I can draw and studied animation and graphic design in college but painting is something I could never nail. I think you need a special gift to be able to paint like that and it's something that can't be taught, keep up the good work chief
Post by aubrey on September 7, 2007
do ou want to help me?
Post by Sabrina on September 19, 2007
Hello thats amazing! anyways I know this is ALOT of work. but anyways ok. im 24 and severly disabled and id just love to have a portrait done of me thats sexy. if you could do this for me id love it Id offer money but being disabled I do not have much of it. But if you have suggestions as to how else I could repay you let me know. Anyways this would mean alot to me.. I have alot of pictures.. id love a pic simular to this sexy beautiful ect. it doesnt have to be excatly like my pictures most are regular pictures but theyd give you an idea of how my body face ect is shaped so you can do a potrait. id like something alone the lines of this but abit gothier if posssible anyways if your interested please mail me at pixie_mischief@yahoo.com thank you so much in advance if you decide to do it. its just... im so used to not being treated like a woman cause im disabled id just love to at least have one sexy potrait done of me.
Post by ER on December 27, 2007
Really AMAZING!! I am currently trying to do a drawing following this tutorial! Can you tell more specific steps when it came to the coloring, such as the colors and settings of layers? Also some tips on the shading! I would really appreciate it. You can e-mail me at er_txz@hotmail.com
Post by kiki taufik R on January 24, 2008
very good i like that
Post by Jess on April 25, 2008
Thank you very much for this tutorial, it sure helped me :D
Post by Marko on February 11, 2009
Beautiful, stunning, really great!
Post by ikkuh on February 16, 2009
Do u draw this with a tablet or with a normal mouse ?
Post by Zaid Quurachman on July 24, 2009
nice, i'll be glad to have this tutorial in PDF, can you make it?!
Post by Pat on July 29, 2009
Hello Your work is breathtaking! I hope you present more tutorials. Thank you so much for sharing with all of us!
Post by Sphynxylynxy on October 27, 2009
Hi, just wanted to comment by saying really a superb tutorial and nicely explained. Thank you for links,tips and requests!! Best Regards
Post by noorjan on April 26, 2010
WoW Great worh ha! This is an amazing piece of work.