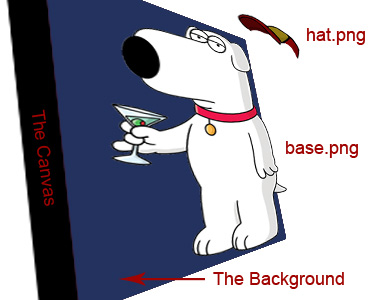
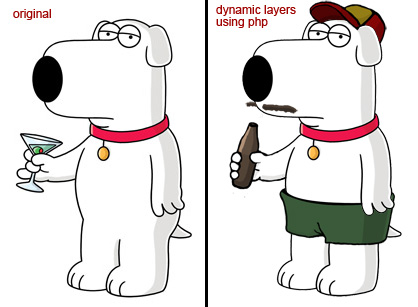
Part Two: Visualizing how it will work in php.
I spent a good amount of time just thinking about how this was going to work. This is what I came up with.

I also knew that I wanted to make this as modular as possible so I decided to use OOP (object oriented programming)
Note: If you are not familiar with Object Oriented Programming, I encourage you to read up on it and come back. Here is a good tutorial from Onlamp.com.
Part Three: Setting the variables
Open up your pure text editor and create a new file. Name it avatar.php
Copy and paste the following code into avatar.php
class avatar
{
var $filename; 		//the filename of the final image
var $width 	= 100; 	//the final width of your icon
var $height = 100;	//the final height of the icon
var $parts  = array(); 	//the different images that will be superimposed on top of each other

}//end of class
Above is pretty self explanatory, I’m just setting global variables.
Part 4: Creating our “set” methods
By set methods, I’m talking about the functions we will use to pass information to our new class.
Copy and paste the following code into avatar.php right after the $parts variable. Please
refer to the comments for explanation.
/**
* 	SET WIDTH
* This function sets the final width of our avatar icon. Because we want the image to be
* proportional we don't need to set the height (as it will distort the image)
* The height will automatically be computed.
*
* @param Integer $width
*/
function set_width($width)
{
//setting the width
$this->width  = $width;
}
/**
* 	SET FILENAME
* This sets the final filename of our icon. We set this variable if we want
* to save the icon to the hard drive.
*
* @param String $filename
*/
function set_filename($filename)
{
$this->filename = $filename;
}
/**
* SET BACKGROUND
* From this function we can add one of two types of backgrounds
* either an image or a solid color.
*
* @param String $background
*/
function set_background($background)
{
$this->background_source = $background;
}

/**
* ADD LAYER
* This is the meat and potatoes of this class (And it's so small!)
* This function let's us add images to our final composition
*
* @param String $filename
*/
function add_layer($filename)
{
//by using the syntax $this->parts[] we are automatically incrementing the array pointer by 1
//There is no need to do $this->parts[$index] = $filename;
// $index = $index + 1;
$this->parts[] = $filename;
}
Ok we have our first part of the class done, we have set our data, now we need to take that data and build upon it.
So let’s create our “build” functions.
Part Four: Building the background.
Copy and paste the following code into avatar.php right below add_layer
/**
* 	BUILD BACKGROUND
*  This function takes our background information and compiles it
*/
function build_background()
{
//----------------------------------------
// Getting the height
//----------------------------------------
//grabbing the first image in the array
$first_image = $this->parts[0];

//getting the width and height of that image
list($width, $height) = getimagesize($first_image);

//finding the height of the final image (from a simple proportion equation)
$this->height = ($this->width/$width)*$height;

//----------------------------------------
// Compiling the background
//----------------------------------------
//the background canvas, it will be the same width and height
$this->background = imagecreatetruecolor($this->width, $this->height);
//----------------------------------------
// Adding a background color
// I'm going to be sending hex color values (#FFFFFF),
//----------------------------------------
//checking to make sure it's a color
if(substr_count($this->background_source, "#")>0)
{
//converting the 16 digit hex value to the standard 10 digit value
$int = hexdec(str_replace("#", "", $this->background_source));

//getting rgb color
$background_color = imagecolorallocate ($this->background, 0xFF & ($int >> 0x10), 0xFF & ($int >> 0x8), 0xFF & $int);

//filling the background image with that color
imagefill($this->background, 0,0,$background_color);

//----------------------------------------
// Adding a background image
// If $background is not a color, assume that it's an image
//----------------------------------------
}else{
//getting the width and height of the image
list($bg_w, $bg_h) = getimagesize($this->background_source);

// Make sure that the background image is a png as well.
$img = imagecreatefrompng($this->background_source);

//This function copies and resizes the  image onto the background canvas
imagecopyresampled($this->background, $img, 0,0,0,0,$this->width, $this->height, $bg_w, $bg_h);
}
}
Ok the background image is compiled and ready to go. Now the moment you’ve all been waiting for! Putting the images together!
Part Five: Building the composition
Copy and paste the following code into avatar.php below the previous function.
/**
* Build Composition
* This function compiles all the information and builds the image
*/
function build_composition()
{
//----------------------------------------
// The Canvas
// Creating the canvas for the final image, by default the canvas is black
//----------------------------------------
$this->canvas = imagecreatetruecolor($this->width, $this->height);

//----------------------------------------
// Adding the background
// If the background is set, use it gosh darnit
//----------------------------------------
if($this->background)
{
imagecopyresampled($this->canvas, $this->background, 0,0,0,0,$this->width, $this->height, $this->width, $this->height);
}

//----------------------------------------
// Adding the body parts
// Here we go, the best part
//----------------------------------------
//looping through the array of parts
for($i=0; $i<count($this->parts); $i++)
{
//getting the width and height of the body part image, (should be the same size as the canvas)
list($part_w, $part_h) = getimagesize($this->parts[$i]);

//storing that image into memory (make sure it's a png image)
$body_part = imagecreatefrompng($this->parts[$i]);

//making sure that alpha blending is enabled
imageAlphaBlending($body_part, true);

//making sure to preserve the alpha info
imageSaveAlpha($body_part, true);

//finally, putting that image on top of our canvas
imagecopyresampled($this->canvas, $body_part, 0,0,0,0,$this->width, $this->height, $part_w, $part_h);
}
}
Ok all the images have been put together, now it’s time to handle image output.
Part Six: The output function
Copy and paste the following code into avatar.php right below the previous function.
/**
* 	OUTPUT
*  This function checks to see if we're going to ouput to the header or to a file
*/
function output()
{
// If the filename is set, save it to a file
if(!empty($this->filename))
{
//notice that this function has the added $this->filename value (by setting this you are saving it to the hard drive)
imagejpeg($this->canvas, $this->filename,100);

//Otherwise output to the header
}else{
//before you can output to the header, you must tell the browser to interpret this document
//as an image (specifically a jpeg image)
header("content-type: image/jpeg");

//Output, notice that I ommitted $this->filename
imagejpeg($this->canvas, "", 100);
}
//Removes the image from the buffer and frees up memory
imagedestroy($this->canvas);
}
There is one function left! No time to lose!
Part Seven: The Last function!
You know the drill 😛
/**
* BUILD
* The final function, this builds the image and outputs it
*/
function build()
{
//Builds the background
$this->build_background();

//builds the image
$this->build_composition();

//outputs the image
$this->output();
}
Part Seven: Using your new avatar class.
Ok. . . your new avatar class is done and ready to go. . . but how do you use it? I’m glad that you asked
because it’s VERY easy! That is the wonder of classes, you only have to write it once and then you can use it
over and over again with ease. All you have to remember are a few functions!
Take a look at the code below.
//creating a new instance of your shiny new avatar class$avatar = new avatar; //setting the width of your final image (the image will //resize themselves dynamically) $avatar->set_width(100); //setting your background color to black $avatar->set_background("#000000"); //you can also send it an image $avatar->set_background("my_background_image.png"); //ah hah! adding your body parts, think of it like layers //in photoshop in reverse order. $avatar->add_layer("base.png"); $avatar->add_layer("beer.png"); $avatar->add_layer("hat.png"); $avatar->add_layer("shorts.png"); $avatar->add_layer("mustache.png"); //you're done setting the width, the background and the //layers, let's build this sucker! $avatar->build();
Conclusion
A whole new world of possibilities opens up! You can create a base character (like good ol Brian here) and over time, create a whole archive of interesting accessories for him to wear!

I hope this was helpful, if you have any questions or suggestions feel free to contact me.
I’m accepting requests. If any of you have a question about Photoshop or PHP and would like to see a tutorial, send me an email here. Make sure that you put “request” in the subject.
« Previous 1 2
Comments
Post by m00dy on July 25, 2007
coool.. thanx i really need thiz for my another project!
Post by vladimir on August 3, 2007
Cool!
Post by Siavash on August 7, 2007
do you have any demo ?
Post by JFuste on August 16, 2007
Fantastic use of GD Library and PHP!
Post by atc on October 6, 2007
cool
Post by darshan gesota on October 18, 2007
Good documentation and use of power of GD with PHP
Post by Alex on November 19, 2007
i found it verry complicated to understand to be honest and couldnt follow all the steps
Post by miley on November 23, 2007
i just stroled threw it all i have to say is wow!!! just giving a shout out miley ^_^
Post by yo on December 4, 2007
thanks x3
Post by terence on December 7, 2007
Wow thanks...can be of good use in my sitehttp://www.empoysworld.com
Post by Alfred on January 19, 2008
thats really nice
Post by Alex on April 23, 2008
For the final image, a background is set. Is there anyway to make the background for the final result transparent instead of a solid image?
Post by Rigo Valencia on June 16, 2008
kool
Post by MaRiSsA iS sO cOoL on July 13, 2008
It looked so confusing i got dizzy and nearly fainted I LOVE TWILIGHT
Post by Matt on July 15, 2008
I'm no artists so when it comes to makeing the graphical parts I'm so lost. Do you know if there exists a suitable collection of basic and free as in speach (OS/CC/Other) art work that would make a good starting point? You can get hold of me via http://lordmatt.co.uk
Post by praveen on July 17, 2008
Thank you for a great tutorial.. where can i get the set of images and objects to create avatars
Post by Gautam on August 1, 2008
gr8 tutorial...i was looking all over this type of code...but i found here...very nice. :)
Post by Chad Allard on November 11, 2008
Note: Can be modified to support PNG-8 alpha transparency (exported from Adobe Fireworks) if use use imagecreate() rather than imagecreatetruecolor in the build process, and then allocate a transparent color with imagecolorallocate(). That way, you can support the transparent PNG images in older browsers like IE6.
Post by Andrei on November 11, 2008
Awesome tutorial! A++ Thank you very much for this
Post by sohail on December 2, 2008
this is exactly what i was i looking for ... thanks alot.
Post by DigiMaX on January 6, 2009
Sry but i got the problem that the background color is always black color, whatever i changed it from #000000 to another color such as #FFFFFF or anyelse...
Post by DigiMaX on January 6, 2009
I found the solution, thanks anyway =)
Post by Keenan on January 14, 2009
I have the same issue, can you please post solution.
Post by saiprasad on April 4, 2009
I am using the above code. but I am not getting any output. I am creating instance and called build function as above
Post by mika on September 9, 2009
kooooooooooool!!
Post by Michael on September 10, 2009
Is there any way to make buttons so that when, for example, the "hat button" is pressed, the hat appears? Thanks!
Post by Cleveland Wolcott on February 9, 2010
Hi, first I want to tell you that I follow your blog. Great post, I totally agree with you. Have a good day mate.
Post by Dyl on June 3, 2011
I am trying your tutorial, but everytime I call $avatar->set_width(125); It says "Fatal error: Call to undefined method avatar::set_width()"
Post by Warning: imagejpeg(): Filename cannot be empty on April 19, 2013
LINE# 183 before: imagejpeg($this->canvas, "", 100); after: imagejpeg($this->canvas, NULL, 100);
Post by Derision on May 25, 2013
I get an error with the $background_color = imagecolorallocate ($this->background, 0xFF &amp;amp;amp;amp;amp; ($int >> 0x10), 0xFF &amp;amp;amp;amp;amp; ($int >> 0x8), 0xFF &amp;amp;amp;amp;amp; $int); line. Help?