Part 3: Building the Foundation
Building an HTML interface is very much like painting. You need to start with a solid foundation and then build on it from there.
A solid foundation ensures that your interface won’t break when you view it in a different browser (namely Internet Explorer 6). It’s important to work slowly here and take the time to periodically check your work across as many browsers as you can. There’s nothing more annoying than working 6 hours and seeing it break the first time you view it in another browser.
Step 1: Add the Doctype
Open index.htm and paste the following code.
<?xml version="1.0" encoding="UTF-8" ?>
<!DOCTYPE html PUBLIC "-//W3C//DTD XHTML 1.0 Transitional//EN" "http://www.w3.org/TR/xhtml1/DTD/xhtml1-transitional.dtd">
<html xmlns="http://www.w3.org/1999/xhtml">
<head>
<meta http-equiv="Content-Type" content="text/html; charset=UTF-8" />
<title></title>
<meta name = "description" content = "" />
<meta name = "keywords" content = "" />
</head>
<body>

</body>
</html>
Step 2: Link the CSS Files and Favicon
1. Paste the following code below the second meta tag.
<link rel = "stylesheet" media = "screen" href = "css/layout.css" />
<link rel = "stylesheet" media = "screen" href = "css/typography.css" />
<link rel = "stylesheet" media = "screen" href = "css/general.css" />
<link rel = "stylesheet" media = "screen" href = "css/home.css" />
<link rel = "Shortcut Icon" href = "images/favicon.ico" />
This links all the css files that we created on the last page. It also links the favicon that we created on page 2.
2. Save index.htm and refresh the browser. You should see your favicon appear in the tab and bookmarks menu.
Step 3: Modify the CSS Reset
3. Open layout.css.
4. In CSS reset make the following changes.
html, body, div, span, applet, object, iframe,
h1, h2, h3, h4, h5, h6, p, blockquote, pre,
a, abbr, acronym, address, big, cite, code,
del, dfn, em, font, img, ins, kbd, q, s, samp,
small, strike, strong, sub, sup, tt, var,
dl, dt, dd, ol, ul, li,
fieldset, form, label, legend,
table, caption, tbody, tfoot, thead, tr, th, td {
margin: 0;
padding: 0;
border: 0;
outline: 0;
font-weight: inherit;
font-style: inherit;
font-size: 12px;
font-family: Arial, Tahoma, Sans-Serif;
vertical-align: baseline;
}
/* remember to define focus styles! */
:focus {
outline: 0;
}
body {
line-height: 1.3;
color: black;
text-align:center;
background: #00295d url(../images/site_background.png) repeat-x;
}
ol, ul {
list-style: none;
}
/* tables still need 'cellspacing="0"' in the markup */
table {
border-collapse: separate;
border-spacing: 0;
}
caption, th, td {
text-align: left;
font-weight: normal;
}
blockquote:before, blockquote:after,
q:before, q:after {
content: "";
}
blockquote, q {
quotes: "" "";
}
2. It should look like this.

Step 4: Add the header
1. Paste the following into index.htm
<div id = "header">
   <div class = "container">

    </div>
</div>
2. Open layout.css and paste the following code after the CSS Reset
/*======================
	HEADER
========================*/
/*
The container div is what sets the width of your content and centers it in the browser.
Each of your main divs will have a container div.
*/
.container
{
	margin:0 auto; /* Centers the div */
	width:960px; /*This is the width of your website */
	text-align:left;
}
/*
Notice that the width of header is set to 100%.
This is so that the background will extend to the edge of the browser.
*/
#header
{
	background:url(../images/header_background.jpg) no-repeat 50% 0;
	float:left;
	width: 100%;
	height:170px;
}
Create the logo
3. Open index.htm and paste the following inside the container div.
<a href = "index.htm" id = "logo"></a>
4. Open layout.css and paste the following right after #header
/*
The a element (which is usually an inline element) gets changed to a block element
so that it can easily be positioned.
*/
#logo
{
	background:url(../images/logo.png) no-repeat;
	display:block;
	position:relative;
	top:6px;
	float:left;
	width:245px;
	height:40px;
}
Create the menu
As a rule you should always use unordered lists to create your menus, especially your main menu. Search engines will see these lists and place more emphasis on them.
5. In index.htm, paste the following right below logo link that you just created.
<ul id = "main-menu">
    <li class = "active"><a href = "">Home</a></li>
    <li><a href = "">About</a></li>
    <li><a href = "">Services</a></li>
    <li><a href = "">News</a></li>
    <li><a href = "">Contact</a></li>
</ul>
Note:The links are empty because we aren’t actually creating a working website.
Notice that one of the li elements has class = “active”, this is our specialized class that gets applied to the current page we are on.
6. Open layout.css and paste the following code.
#main-menu
{
	float:right;
	position:relative;
	top:23px;
}
#main-menu li
{
	background-image:url(../images/main_menu.png);
	background-repeat:no-repeat;
	background-position:0 0;
	float:left;
	margin: 0 12px 0 12px;
	padding:0;
	height:23px;
	list-style:none;
	line-height:1;
}
/*
The over and active state get handled here.
Notice the use of negative pixels? This is the advantage of CSS sprites.
Instead of using two images to achieve the effect, we just use one and move it.
*/
#main-menu li:hover, #main-menu li.active { background-position: 0 -23px;}
#main-menu li:hover a, #main-menu li.active a{ background-position: 100% -23px; }
#main-menu li a
{
	background-image:url(../images/main_menu_right.png);
	background-repeat:no-repeat;
	background-position:100% 0;
	display:block;
	padding:4px 10px 5px 10px;
	font-size:14px;
	color:#fff;
	text-decoration:none;
	vertical-align:middle;
}
When you’re done your header should look like this

Step 5: Add the Body
Add the #main, #wrapper, #container and #content divs
1. In index.htm paste the following inside the #main div.
<div id = "main">
	<div id = "wrapper">
    	<div class  = "container">
        	<div id = "content">


                </div>
        </div>
    </div>
</div>
2. Inside layout.css paste the following code after the #main block
/*======================
	MAIN
========================*/
/*
The width is also set to 100% because there is a background image
that we want to go to the edge.

Notice that height isn't set for #main, this is because it will need to expand
with the content.
*/
#main
{
	background: #fff url(../images/main_background.png) repeat-x;
	float:left;
	width:100%;
}
/*
All this does is add the background that makes the content appear
to pop off the screen.
*/
#wrapper
{
	background: url(../images/base.jpg) no-repeat 50% 0;
	float:left;
	width:100%;
}
/*
This div sets the default height of your content and also adds a gray
background to the right column.
*/
#content
{
	background:url(../images/content_background.gif) repeat-y;
	float:left;
	width:940px;
	margin:10px;
	min-height:515px;
	height:auto !important; /* IE 6 min-height fix */
	height:515px; /* IE 6 min-height fix */
}
It should look like this

Step 6: Add the Footer
Add the #footer and .container div
1. In index.htm paste the following code. We add the container div again because the content needs to be centered.
<div id = "footer">
	<div class = "container">

    </div>
</div>
2. Add the following code to layout.css
/*======================
	FOOTER
========================*/
/*
This adds the site bottom and makes it expand to the edge of the screen
like we did with #header and #main
*/
#footer
{
	background:url(../images/site_bottom.gif) repeat-x;
	float:left;
	width:100%;
	height:70px;
	padding-top:30px;
	font-size:12px;
	color:#fff;
}
Add the footer menu
We will add another ordered list to make the footer menu. Keep in mind that search engines really like menus at the bottom of the page.
3. Paste the following inside the container div.
<ul id = "footer-menu">
    <li class = "active"><a href = "">Home</a></li>
    <li><a href = "">About</a></li>
    <li><a href = "">Services</a></li>
    <li><a href = "">News</a></li>
    <li class = "last"><a href = "">Contact</a></li>
</ul>
4. Open layout.css and paste the following below the #footer block.
/*
Adds a 7px margin to the bottom of the menu
*/
#footer-menu
{
	margin:0 0 7px 0;
	padding:0;
}
#footer-menu li
{
	padding:0 6px 0 6px;
	display:inline;
	border-right:solid 1px #fff;
	list-style:none;
	vertical-align:middle;
}
/*
This removes any inherited borders
*/
#footer-menu li.last
{
	border-right:0;
}
/*

*/
#footer-menu li a
{
	font-size:12px;
	color:#fff;
	text-decoration:none;
}
/* Adds an underline when hovered or active */
#footer-menu li a:hover, #footer ul li.active a
{
	text-decoration:underline;
}
#footer-menu #info
{
	font-size:10px;
	padding:6px;
}
5. Save layout.css
Add the footer info
The footer info will hold the copyright information.
6. Paste the following into index.htm right after the footer menu.
<div id = "info">
Company Website © 2009 All Rights Reserved.
</div>
7. Save index.htm
8. Open layout.css and paste the following below the #footer-menu block.
#footer #info
{
font-size:10px;
padding:6px;
}
9. Save layout.css
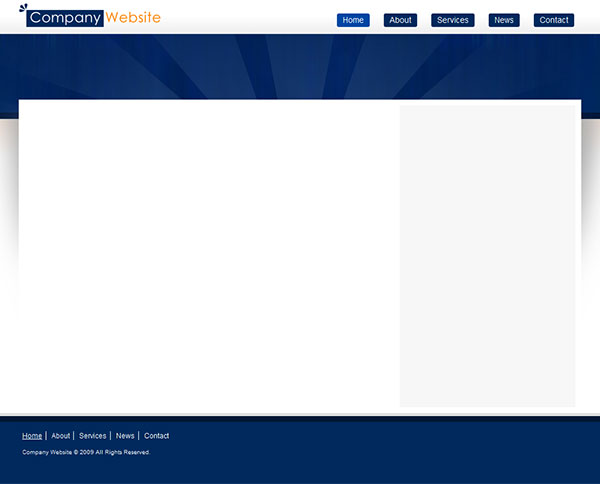
The foundation should look like this:
Comments
Post by hajan reckiest on September 1, 2009
very good download
Post by Antwan on September 10, 2009
Hey! Thnx for this tutarial, it helped me to understand the basics of slicing and creating a solid -cross browser- webpage. With my PHP expierences this will help me master all elements to create a dynamicly perfect website! PS1: Are you planning to add a part of navigation user firnedly through the menu? PS2: Seems you forgot somethings (I didn't have all the images in te process) and what exactly is the styles.htm for..?
Post by Joshua Bolduc on October 3, 2009
Styles.htm is the place where you can put all your generic html elements (headings, images, paragraphs etc) that you'll use throughout the rest of the website.
It's a great way to see how all the elements will work together and also ensures that you don't forget anything.
Post by Avijit Dey on October 30, 2009
very good to learn in very short period....
Post by pascal on November 4, 2009
Thanks voor the great tut!
Post by Bob on November 9, 2009
Great tutorial. I particularly like your CSS breakdown/organization methodology. Thanks!
Post by Albin on December 13, 2009
Hai! thanks. I am not able to downloade the psd file you have given. It is downloaded without layer i.e., Composited layer (0ne layer). What should I do?
Post by Joshua Bolduc on December 13, 2009
It sounds like you're opening the file with Adobe Acrobat. Make sure you open it with Photoshop.
Post by Twitz on January 24, 2010
Hmmm. Wouldn't it be easier to just do a File / Export to the CSS and HTML after the slices are all added and let PhotoShop create the files for you? :o)
Post by Joshua Bolduc on January 24, 2010
Hi Twitz, That is an excellent question.
There are a few reasons why you shouldn't export directly from Photoshop.
Photoshop doesn't generate standards based code.
The design won't look the same in all browsers.
Photoshop can't create repeating backgrounds which are crucial in pretty much all designs.
Coding it by hand results in much leaner code that downloads faster.
However, exporting from photoshop could be useful for protyping purposes . . .
Post by eve on February 1, 2010
awesome tutorial.. exactly what I needed! Helped heaps xox
Post by peter on February 10, 2010
when i open the Home.psd file in photoshop cs4 on a mac to begin slicing i see a bunch of blue outlines with numbers in the upper left hand corner. What are these and how do i get rid of them so i can see what i'm slicing (and saving because they show up when i'm trying to save the slices as well. thanks i'm a newbie to this.
Post by Bill Miller on February 12, 2010
Great tutorial. It has helped tremendously.
Post by BerggreenDK on November 25, 2012
Just a few comments. First of all, the favicon.ico ought to be placed in the ROOT of a website, as robots and browsers look for /favicon.ico by default. So those not parsing the HTML for shortcut icons etc. will still find it. Secondly, if you shorten your folder paths to images and css, you will generate shorter HTML which again will let your page load faster. If you only include a few images, this might not seem like a lot, but if you have 10000 visitors the difference between placing everything in /images/ versus /g/ addes 5 bytes ekstra download per image. Lets say you have 30 images on a page, thats 30x5 = 150 ekstra bytes pr. page. Then if you have 10000 visitors it addes up to 1.500.000 bytes or more than a megabyte trafik. Same goes for long css descriptions where you dont need them all as they are nested and therefore can be uniquely identified from a top #id or .class. Eg. if you place the footer menu inside footer, you dont need to specify the class/id in the html as there is only one type of inside the footer and that would be the menu. So instead of spending a lot of bytes on each page, you can spend a little extra bytes on the css (which is downloaded and cached between pages when placed in an external file as you already do) and then shorten the HTML a LOT and it will still make sense afterwards when reading it.